Noticias de la empresa

Noticias corporativas

Aplicación de un instrumento de medición de imágenes con un solo botón en la detección automática de dimensiones precisas de piezas PEEK

Clasificación: Noticias, Noticias de la empresa Fecha: 2020-01-16 Volumen De Lectura: 85

1. Components of one-button image measuring instrument:


The core hardware of the one-button image measuring instrument is composed of upper and lower light sources, a high-pixel CCD camera, a telecentric lens with a wide viewing angle and a large field of view, and a fixed stage, and its structure is relatively simple.
2. Working principle of one-button image measuring instrument


One-button image measuring instrument is a new type of image measurement technology. It is different from the traditional two-dimensional image measuring instrument in that it no longer needs a grating scale displacement sensor as an accuracy mark, nor does it use a large focal length lens to magnify the product image to ensure measurement accuracy. The one-button measuring instrument uses a telecentric lens with a large viewing angle and a large depth of field to reduce the product contour image by several times or dozens of times, and then transmits it to a high-resolution CCD camera with millions of pixels for digital processing. The background drawing measurement software with powerful computing power then quickly captures the product contour map according to pre-programmed instructions, and then compares it with the ruler formed by the tiny pixels of the high-pixel camera to calculate the product size and complete the evaluation of the dimensional tolerance at the same time.
3. Features of one-button image measuring instrument
1. Flash measurement, extremely fast measurement speed, can complete the drawing, measurement and tolerance evaluation of less than 100 dimensions within 1 second, and the efficiency is dozens of times that of traditional two-dimensional image measuring instruments.
2. Automatic image matching function, the measured workpiece can be placed arbitrarily, without the need for positioning fixtures, focus adjustment, and manual operation of the stage;
3. Multiple workpieces can be measured at the same time, without the need for single measurement of each workpiece; avoiding the error caused by the increase of the measurement stroke. Repeated measurement accuracy is high, which solves the problem of poor consistency of repeated measurement data of the same product.
1291579156509369

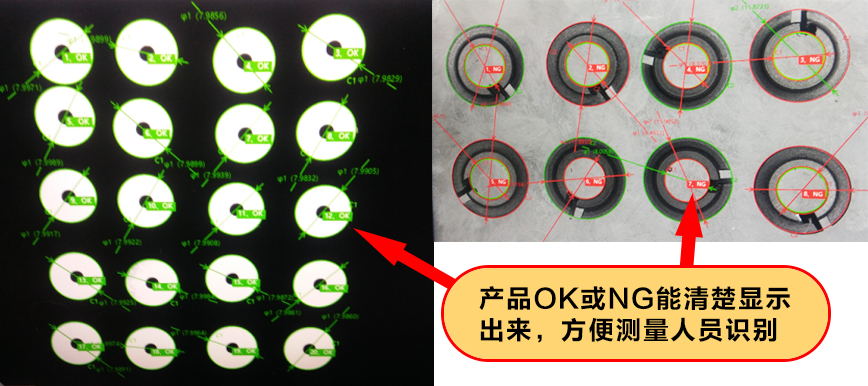
4. Measurement, simple operation, can quickly complete all measurement processes and output measurement results; 5. The instrument has a simple structure, does not require displacement scale grating scale, and does not require platform movement during the measurement process, effectively preventing measurement errors caused by product displacement; the instrument has good stability. 6. Only one function calibration key is required, multi-angle, full-range, full-view calibration to ensure measurement accuracy. 7. Automatically save and output the report of measured dimensions and tolerance evaluation. The product name, measurement date, measurement time, and measurement personnel in the report can be clearly seen, which is convenient for future tracking. (See the figure below)


4. Application fields


Junhua PEEK is a company with a full industry chain that integrates PEEK (polyetheretherketone) resin polymerization, continuous extrusion molding of profiles such as plates, rods, tubes, and sheets, and the research, development, production, and sales of finished parts. PEEK (polyetheretherketone) is widely used in aerospace, automobile manufacturing, electronics, and medical fields due to its excellent comprehensive performance.
The company’s newly purchased one-button image measuring instrument is widely used in aerospace, automobile manufacturing, electronic and electrical, medical industries and other fields, contributing to the quality of products used in these industries and protecting them. With the addition of the one-button image measuring instrument, product measurement is no longer difficult, the inspection efficiency is greatly improved, the product delivery date will be more punctual, the product size and product quality will be better, the future of Junhua PEEK will be better, the company will be stronger, and the company’s business will be prosperous.

Recomendaciones Relacionadas